Design, Life, and Style.  A chic lifestyle blog. Design, Life, and Style about me link Design, Life, and Style advertisement/sponsorship link Design, Life, and Style travel reviews link Design, Life, and Style recipes/cooking link Design, Life, and Style fashion/style link Design, Life, and Style interior design link Design, Life, and Style home link

Monday, June 20, 2016

Maternity Style: Things I learned the 2nd time around


dress: c/o PinkBlush Maternity shoes: Christian Louboutin bag: Gucci Kendall's dress: Old Navy

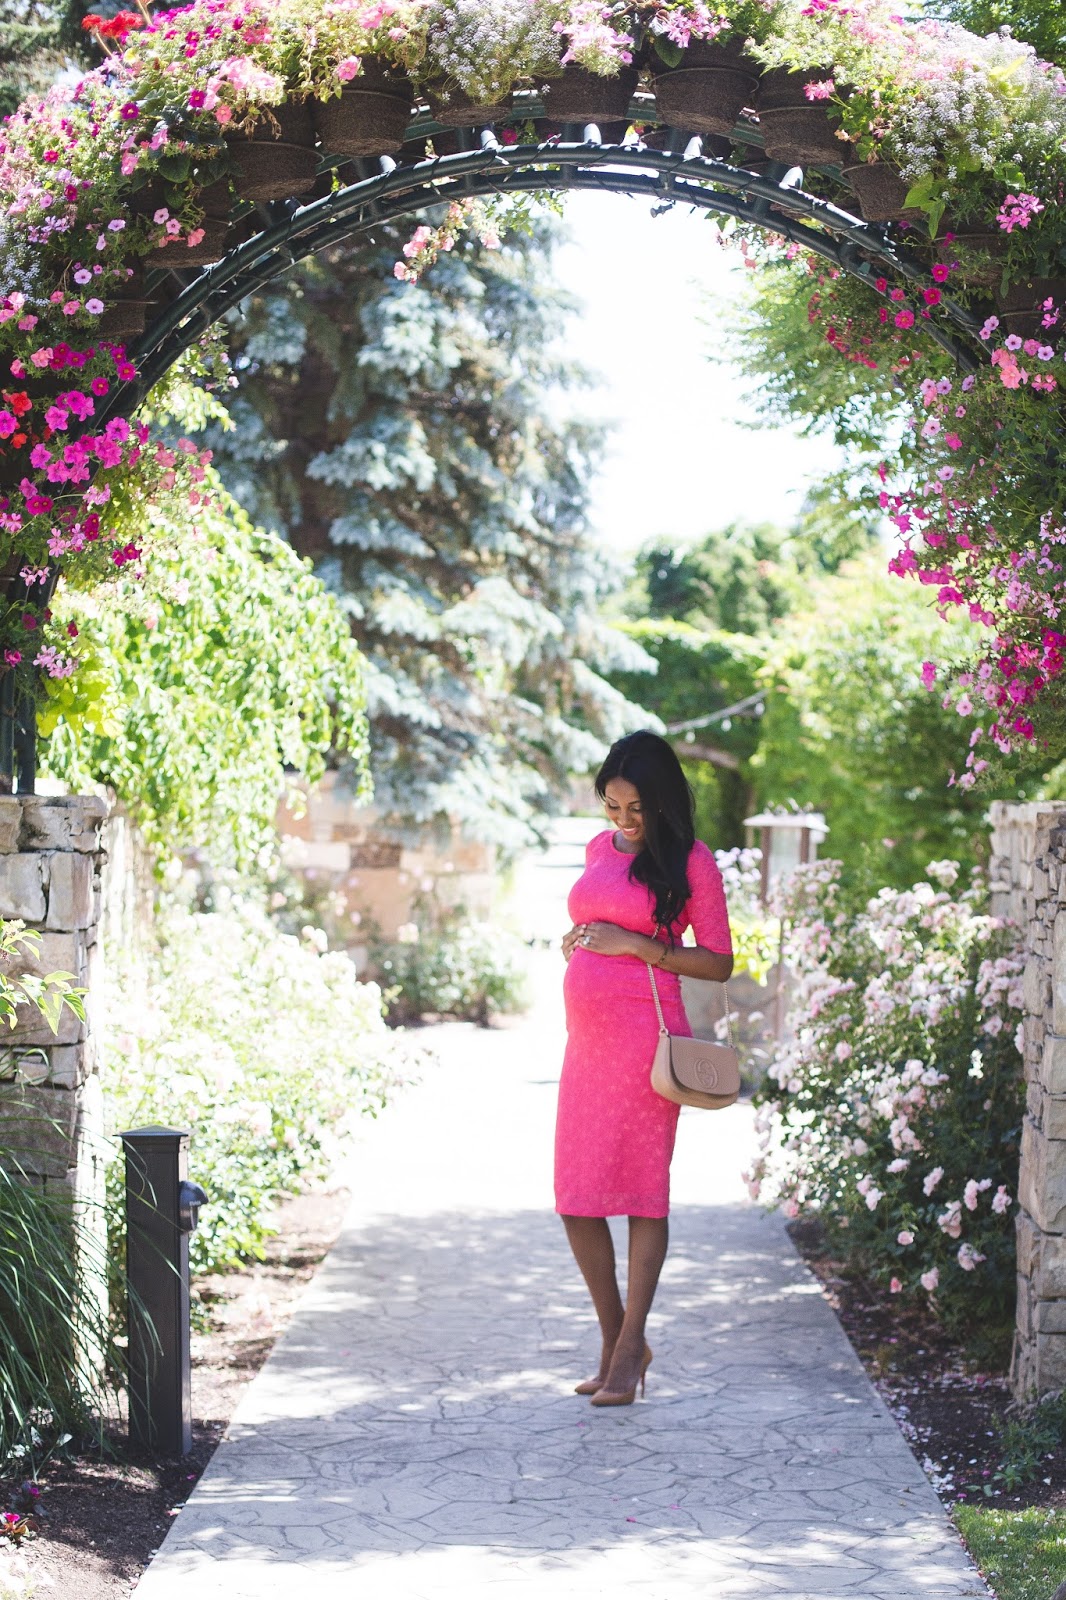
My goodness it has been a long time since I've done a fashion post! I have been getting lots of questions on the clothes I've been wearing during this pregnancy and then to my absolute delight was contacted by PinkBlush Maternity to collaborate; so I thought this is the perfect time to write a blog post about maternity style!

It just so happens that in both of my pregnancies I have been in the third trimester through the summer. So hot, so sweaty, and so uncomfortable. Think LOTS of ankle and feet swelling (super cute, I know). My oldest daughter Kendall was born on September 24th and I am due this time around on September 9th so staying cool and comfortable while attempting to still look stylish has been my goal both times.

My first piece of advice is to find a style of dress that works for you and your bump. I have found the the more form fitting "sheath" style dresses look the best on me by far! I wish I could pull of the flowy boho look but with how large my bust gets it just does not suit my body.  You should try on dresses in a number of different cuts and styles to find one that works best for your figure. I guarantee you'll be able to find a style that makes you feel beautiful and put together. This gorgeous lace sheath dress from PinkBlush maternity makes me feel so pretty and feminine (and maybe even kind of sexy to my surprise). When I first put it on and felt confident I knew it would be an instant favorite!

Now, I say find a style of dress because with both of my pregnancies by the time I was ready for maternity clothes it was getting warm outside and dresses were the best option to keep me cool. I run HOT when I'm pregnant and there's nothing worse than being a hot, irritable, pregnant lady through the summer. If you are pregnant during the cooler months replace my first piece of advice with finding a style of maternity jean that works best for your body type. Try on a number of brands, styles, and sizes to make sure you're investing in what will really suit your body the best.

Next, layering is a great idea. Buying maternity clothes can be a hefty investment so look for pieces that you can layer to help you get through the seasons (and multiple pregnancies) without buying more clothes. Once again, dresses are great because you can add a sweater or jacket and have it work for spring or fall. I also try to buy basic dresses that can be dressed up or down. You'll find me wearing the same dress on a random Thursday at the park with flip-flops and then to church the following Sunday with strappy high-heeled sandals. Also, make sure you have a good basic t-shirt in a neckline that flatters you most (I prefer scoop neck) and then you can pair that with anything and everything from jeans to skirts to sweats!

Finally, make sure buying a quality nursing bra is on your list of things to buy not only for when you have the baby but for those last few months of pregnancy. I own nursing bras in 3 different sizes.  This was a lifesaver as my breast grew and then began to shrink through the process of nursing Kendall for a year.  Once I outgrew my typical DDD bras (to my horror and dismay) I found that it was just best to go straight into nursing bras as opposed to finding regular bras that fit such a large cup size. Having a properly fitting bra will make your clothes look better, will take some of that pressure off of your back, and hopefully will prevent extra sagging due to lack of support.

All of the items I discussed can be found at PinkBlushMaternity.com. They have an incredible selection of carefully curated items for the stylish and modern mommy-to-be. If you'd like some more insight into my thoughts on pregnancy and motherhood make sure to follow me on instagram (@designlifeandstyle) and snapchat (@lea_leyds). Have a great Monday and here'e to a wonderful new week!

Wednesday, April 20, 2016

The Custom Home Plan Design Process


Today's post is the first post of what I am sure will be many in documenting the process of building our first custom home. Although this will be our first time actually building a home, we've designed 3 ,yes 3, different home plans along with the help of local home designers (more on that story later). So I feel like I have come to understand the process at a deeper level and I wanted to share with you the things I've learned along the way that I wish someone would have told us at the beginning of our journey. My husband, Nic, has also offered to interject some of his opinions as well so he'll be adding notes here and there in blue. I've split the process into a 3 steps to hopefully explain this as simply as possible but as you guys know I can get a little wordy so I apologize in advanced for the length of this post.  I promise you that if you're planning on building this will be very helpful!
  • The Pre-Design Stage
    • This is the time where you should be looking for as much inspiration and direction as you possibly can.  (Over the past few years, I think Lea and I have reviewed hundreds of stock plans online, in magazines, books, etc. to identify & formulate elements we wanted to include in our plan.  Often times, when you begin this type of process, you don't know what you don't know and I feel this step really helped [at least for me] better understand my own style and what I like.) This step really should be the longest step in the whole process. I say that because if you do your homework ahead of time, once you start meeting with architects/ home designers you'll be prepared to convey a very direct and well formed vision of the home you're dreaming up in your head. Part of the reason Nic and I didn't build 2 of the 3 plans we had designed is because we didn't do a great job of refining our vision initially. We wanted ALL THE THINGS (and still do kind of want all the things but we've gotten better, haha). We wanted massive living spaces, big closets for all of our bedrooms, roomy bathrooms, I wanted all the bedrooms upstairs, Nic wanted a main floor master bedroom, a big pantry, big master closet, storage everywhere...the list went on an on. We had a very strict square footage maximum in mind and the truth is that it was literally impossible to fit all of our wants in a home of that size (I may be the guilty party here ;)  ). If we had really done some soul searching and prioritized our wants and needs (and also settled our differences) we would've had much better experiences. Another aspect that you need to consider in the pre-design stage is timing the build correctly. We wanted to build back in 2013 and the timing just wasn't great for us at the time. We ended up selling a condo, a home we bought and then renovated, as well as a custom building lot we expected to build on in order to come to a point now where the timing is right for our family and we can really build the home that we want.  Side note- My personal opinion is that custom homes should not be rushed and should not be an impulse decision. It takes a lot of work and forethought to design and build a house that has never been built before so really invest a lot of effort in the pre-design stage.
    • My tips:
      • 1. Spend a lot of time browsing sites like Houzz and Pinterest to figure out your personal style and what aspects of a home catch your eye.
      • 2. Buy home magazines and search the MLS in your area (utahrealestate.com for those of you in my state) to find inspiration for interior and exteriors you like.
      • 3. Figure out whether the interior or exterior of a home is more important to you. I added this as a tip for a couple reasons. First, as everything in life tends to be you'll make tons of compromises (unless you have an unlimited budget and in that case; congrats! You won't need to make very many compromises). There is always a give and take when designing a home. We had to be willing to have some rooms be smaller than we wanted or have ceilings not as high as we wanted to achieve the look on the exterior that we wanted. Remember that everything is related. Don't expect to bring in your perfect idea of a floor plan then tweak every room and have it still look the same on the outside, because it will not! A lot of home designers will try to tell you to work on the floor plan first and do not worry about the exterior until you lock in the floor plan but I feel that truly beautiful and well thought out homes have both aspects in mind at all times. So, make sure that if you truly have your heart set on a certain exterior or a certain floor plan that you are willing to make compromises to keep that dream intact.  (I personally like to find an exterior I like first and make a floor plan fit the exterior, but I don't think there's really a right or wrong way to do it.  In the end, Lea and I came across a concept we both liked and then ended up with a totally different end result that we both loved!)
      • 4. Do you know of a home that has a floor plan that you love? Draw a quick sketch so that you can bring it to your home designer. Also, you can browse thousands of stock home plans online that you can customize to your hearts desire to create a better plan.   Designers are careful not to copy other plans so make sure they understand it is just for inspiration or a jumping off point to create your own unique custom plan.
      • 5. Drive around and look at houses in your area that you love. Try to identify why you love them. Is it the big front porch? Is it all the windows? Is it the grand entry? If you want to incorporate these aspects into your plan you need to know this ahead of time.  (This is really key!  Small details seem insignificant in most cases, however, many of these insignificant elements eventually add up to the character and reason why you love a home.  Examples may include the pitch or steepness of the roof- something very trivial I'm sure very few people would care about, but combine this with an upgraded roofing material for example [something other than just your typical asphalt shingle] like a cedar shake roof, metal, slate or a tile type material and all of the sudden your home stands out from 95% of the other homes out there in suburbia.)
  • The Selection Process
    • Now that you have a very solid idea of what you want your new home to look like, it is time to find someone to bring that vision to life! If you've done your homework in stage one (or hired a designer like me to do your homework for you) you should be able to identify homes that fit your expectation level of a well designed home. Find a home designer or architect that builds homes that make you go "wow" and are still a similar size or price-range of the home you are hoping to build. The cost of your plans will vary GREATLY depending on what type of designer you're interviewing and what type of plan you're looking for. I like to separate home plan cost into 3 different categories:
      • 1. Semi-custom plans- This is when you agree to use a plan that was already designed by the home designer previously and then it is modified to fit your needs. You may bump out a wall here or there, maybe even add an addition, but the core integrity of the plan is maintained. This is a great and cost effective route to take if you just do not want to invest the time and energy into completely custom plans.
      • 2.  Custom Plans- Most people wanting to build a custom home expect to have a plan that has not been built before. You'll work with a home designer to have them bring an idea to life that you already have. Your vision will act as the initial template for the plan and they will draw it out for you. A lot of the research, planning, and design decisions will be made by the owner and then actualized by the designer.   Pricing in this category varies greatly depending on the designers level of experience, reputation, location, etc. so make sure to shop around with the designers in your area if you'r going in this direction.
      • 3. High-end Custom Plans- This takes the custom experience up a notch. Designers that offer this type of plan will work with you tirelessly to create a truly unique and personalized home plan. Imagine an architect sketching your vision as you meet with him/her. Taking abstract ideas and putting them to paper. They will add beauty and detail above and beyond what you've suggested to create a brand new masterpiece specifically suited for you. The level of attention to detail and thoughtfulness should be unmatched. This costs BIG BUCKS but if you want a truly custom home this is the route you'll need to go.
    • Lucky for us my brother-in-law is a home designer. We chose to do a traditional custom plan with him. His pricing was affordable and fit in our budget and we knew that he was someone we could trust to execute our vision how we wanted it done. so, long story short, keep your price range and expectations in mind. Similar sized homes could be designed for less than $5000 or more than $25000 all depending on who you choose.
    • Interview a number of designers and make sure to request to see their work and ask for references. It is definitely not too much to ask to see some of their work in person and speak with people that have worked with them in the past.
    • Commnciation is KEY! Make sure to hire a designer that you can communicate well with. There will be a lot of back and forth between you and the designer, so make sure it is someone who you'll enjoy working with.
    • Be very direct with your expectations in regard to time frame. If at all possible get it in writing that the plans will be completed by "x" date.
  • The Design Stage
    • This is the fun part! This process will go something like this:
    • 1. You'll have a meeting with your designer to really nail down what you're looking for in the home.
    • 2. The designer will provide you with a preliminary floor plan. You'll work on this floor plan until you are satisfied with it (this could take an hour, days, or in our case months to do depending on turn around time between you and the designer. Once again this goes back to why interviewing is so important. Make sure to find someone that is responsive to your requests.)
    • 3.Once you sign off on the floor plan it is considered finalized and the designer will get going on the exterior. Is it possible to adjust the floor plan at this point? Of course! But just remember that the exterior may change with any interior adjustments and at this point some rooms may be fairly restricted in what you can do with them without making major changes to the floor plan. After this, the designer will send you the exterior elevation. Things to consider during this stage:
      • Does the home look proportional? Is there anything that just is not pleasing to your eyes with the exterior walls, roof lines, window placement? Ever driven by a home and just found something strange looking about it? Usually those kinks can be worked through during the design stage if you are observant. 
      • Am I taking advantage of my lot? Do you have windows where you want to take in views? Will there be enough light? Should I position the home more to the left so that I have more driveway space going into the garages on the right? Things like this.  Your home designer will keep some of these things in mind but just remember that this is YOUR house and so you will have the most insight into your needs.  (I think this is the number one item you need to consider when designing custom - NATURAL LIGHTING!  How will your house sit on your lot.  Know which direction faces north, east, south and west.  Remember the north facing side of your home will rarely if ever get direct sunlight throughout the year.  Take this into consideration.  If you want great morning light in say your kitchen, have it on the east side of the plan.  PLACE AS MANY WINDOWS AS YOU CAN ON THE SOUTH FACING WALL(S).  Your south face will make your house a place you love living, being filled with natural light.  I think this is an area people overlook when designing.  West faces will be similar to east faces but give you great light in the evening hours.)
      • Am I adding interest to the home with architectural details? Most good designers will provide you with an exterior elevation that will incorporate appropriate style details. Things such as shutters, unique windows, exterior finish materials, how high the roof should be, how much of an overhang on the roof, columns, railings, etc. will all need to be worked out on your exterior plan. Take the research you did in the pre-design plan to make sure your home has special features that will set it apart from the rest. (this is also where a good interior designer could consult with you to make sure you're hitting the mark). (Know your home styles.  Study up a bit online or reading some books and learn what distinguishes the general styles of homes out there:  Prarie-Frank Lloyd Wright styles, Mid-century, Craftsman - Northwest or Mountain styles, Victorian, Colonial, Farmhouse, Shingle, Mediterranean, Tudor, Chateau, French Country, Contemporary, Americana, etc.  Often times we like elements from many of these styles but knowing which elements go with which style will really help out.  For example, you're not going to want to mix Tudor elements on a Colonial style home.  Obviously you can do whatever you want, but staying true to an overall style and theme will go a long way to ensure everything turns out cohesive and the way you've always envisioned.)
    • 4. Now you have your floor plan and exterior finalized. Time to give everything your final stamp of approval and move on to engineering and permits!
    • 5. Some other options to consider are 3-D renderings or full color renderings. Some designers will offer these option but often at an additional cost. If you're a visual person and just really need to see a realistic mock-up of the home it may be worth your while to invest in this.
The entire process for the plans we are building took us about a year and a half from our first "interview" until engineering was completed. Being the impatient person that I am my husband reminded me many times during the process that if we were going to do this we were going to do it right and so we really took our time. (This is probably one of the biggest, if not the biggest financial decision you will have made up to this point in your life.  Take a step back, let the dust settle and then revisit the plan a week, month or a few months after doing the initial work.  You'll probably find that things you thought you liked a month ago, you no longer like.  You may also find things you may have not liked, are now just fine.  I swear you will ALWAYS find things you can change, no matter how many times you comb through the plan.  Lea and I probably went over our current plan 10 days straight after we thought we had completed it, and would without fail find new little tweaks we thought would work better.) Between life getting busy, our designer getting busy, holidays, blah blah blah we definitely could have pushed this through faster if we tried but I am honestly so happy with how our plans turned out and I literally start shaking with anticipation when I think of our plans coming to life.


 For fun I've included a preliminary floor plan for the home we were hoping to build back in 2013 (above), this was when we ended up buying our Alpine house instead.  My gosh there are SO many things I would change about this plan looking at it now! I still think it would have been a beautiful home had we built it though.  The reason we designed three different homes and only plan to build this most recent plan is because our wants, needs, and style has evolved through the years. We started out in 2012/2013 working with a semi-custom builder who had an in-house home designer.  Building with a semi-custom builder or "big" builder (some in our area include Ivory Homes, Edge Homes, DR Horton, etc.) means that in most situations you buy the land directly from the builder and get it for a much more affordable rate because they bought and developed the land in bulk for the neighborhood and will recoup much of that cost when people build on the lots. In the end we weren't satisfied with the plans we had to choose from or the "customized" plans their in-house designer created for us and so we decided to go the custom route (not to mention that during this time we found a beautiful custom build lot and a lot of the savings we would have gotten in building on the "big" builders land would have been lost had we still used them).  The second set of plans were for our new custom lot (these are the plans I posted a photo of above). You may remember this post announcing that we would be building. As we were working on these plans we found our Alpine house, fell in love, decided to take on the challenge of remodeling it, and tabled building for until we sold the Alpine house. Fast-forwad 2 years, we are preparing to put the Alpine house on the market and looking into building on our custom lot. After those two years have gone by we decided against doing a traditional two-story home (which our original plans were) and started fresh with the current plan we have now. Then...in the middle of this process we get contacted by a family wanting to buy our custom build lot, we sell it, and are now looking for land again. We find land in a wonderful neighborhood and we had to tweak our plans a little to fit the new lot but that leads us to where we are today. A VERY long process; but a process where we learned so much along the way!

Thank you very much for reading this lengthy (my fault, sorry hun ;)  )post. If you have any questions pleasepleaseplease leave a comment or find me on instagram (@designlifeandstyle) and ask away! I love to help in any way that I can. Have a wonderful week!


Monday, September 28, 2015

Kendall's 1st Birthday Party


We had the pleasure of celebrating our daughter, Kendall's, first birthday this weekend. The past year has flown by and watching her grow right before our eyes has been the most amazing experience. Her personality is blossoming more and more everyday, and her curiosity is too. She loves people and observing the world around her. She is seriously the biggest joy and I cannot wait to see what this next year will bring for our sweet little angel.

To celebrate Kendall turning one (and Nic and I making it through our first year of parenthood) we decided to throw a small get together. We invited our family and a few friends over for lunch and lots of treats last Saturday. Our nickname for Kendall is Kendi and we think it is so adorable that some of our younger nieces and nephews pronounce it "candy" so that inspired me to do a candy shop theme for her birthday party. Then when I found these adorable candy party themed invitations on Tiny Prints I knew I was going to have so much fun putting this little party together.

To keep the candy theme going without going too over the top on decorating or food I decided to make a small candy bar that would double as the party favor. I ordered custom lollipops from Oriental Trading that said," Thank you! Love, Kendall". The lollipops even had her photo on them! I bought a few different types of bulk candy and displayed it al in glass vases and jars that I had around the house. I wanted to have pink and white stripes be a common theme so I found some cute striped fabric at Hobby Lobby and had my mom create table runners out of it. The other little decorative touches were a hanging candy wall going along our staircase and I wrapped our front porch pillars in pink streamers so that they looked like candy canes.


Above is the hanging candy wall that I created to use as a backdrop for photos. I bought yarn from Hobby Lobby on clearance for 88 cents and a big bag of salt water taffy. My mom and I strung the candy while watching Empire haha. It maybe took 30 minutes to create and cost $4 so I was very happy with how this DIY project turned out. (and if you notice two pieces missing it is because my husband ate them before I even had a chance to take a pic).

That was really about all of the prep work I did! I ordered most of the food from Costco and set it up buffet style on our kitchen island as I usual do when we're entertaining. I had seating inside and outside which worked wonderfully since the weather was gorgeous. The cake was ordered from a local bakery, Dippidee, and then I did all of the decorating which was very convenient for a couple reasons. 1. I am really not the best baker and this ensured the cake would taste wonderful and 2. Decorating is the fun part of cake baking and I was able to do it in only about 10-15 minutes!

We really enjoyed spending the day with so many people that are special to us and celebrating our little girl. Kendall actually really enjoyed herself and I am sure she will love looking back on the photos of her little party when she is older. I hope you enjoy the photos below! As usual I did not get as many photos as I would have wished. I need to do a better job of getting group photos (I basically only have pics of us and my sisters family, whoops!)! If you have any questions about party planning or entertaining feel free to shoot me an email lea.leydsman@gmail.com.

Have a wonderful day!


pink & white striped mylar balloons: Oriental Trading
bulk candy: Oriental Trading
custom photo lollipops: Oriental Trading
table runners: Hobby Lobby fabric
cake: Dippidee
table cloths: Bed, Bath, & Beyond
my dress: Vince via Nordstrom (I'm wearing a size small)
Kendall's dress: Crewcuts (runs large)


Saturday, July 18, 2015

Master Bathroom Reveal


The master bathroom had great bones but needed some freshening up! Read my design summary below to learn how I chose the finishes to create this master bathroom transformation.


Above is the master bathroom before we updated it. Much more dark and heavy than the airy and refreshing master bathroom retreat I was hoping for.


Lighting Fixtures: Galaxie Lighting
Faucets: Moen via Lowe's
Frosted Water Closet Door: Jeld-Wen
Vanity Mirror: TJ Maxx
Flooring Tile: Ceramic Faux Travertine
Cabinet Color: lacquer matched to Sherwin Williams Extra White
Hand Soaps: Pecksniff's via TJ Maxx
Towels: TJ Maxx

The master bathroom is one of the features that sold me on this house. It is very spacious and had all of the amenities I was looking for. With our modest renovation budget we did not have room to change the tile or major plumbing fixtures, like the bathtub. However, we were able to use what we had while still creating a light and refreshing space. 

We changed the paint color from a darker tan with sage undertones to Sherwin Williams Agreeable Gray which is much more neutral and soothing. We painted the trim white instead of off-white to add contrast and match the cabinetry which we also had lacquered white. The cabinets were originally a dark cherry stain and having them painted white made a massive difference and made the room feel even larger.

The existing tile in the room is a ceramic tile that is manufactured to look like travertine. It really is an excellent ceramic product and almost fooled me! I totally thought it was the real deal. The tile is even prettier in person when you can see the detail. To coordinate with the existing tile we had crema marfil marble countertops installed for the vanity. It mimics the light tan tone of the faux travertine and has some white veining to compliment the cabinet color. We chose square sinks to match all of the straight lines in the room and also chose faucets that repeated the straight line theme as well. These faucets are one of my favorites from Moen. I purchased them from Lowe's.

Changing lighting is an inexpensive way to really breath new life into a room.  I found that I favor brushed or satin nickel with tan colors as opposed to a polished metal or iron finish. We purchased all of our new lighting for the home (with the exception of the pendants over the island) from Galaxie Lighting. Galaxy Lighting is located in Lindon, Utah but has a wonderful online presence. Their website is easy to use and has all of their inventory on it. It made it so easy to browse while at home (or let's be honest... I did most of my browsing at work. Oops!) and then compare prices to other online retailers and Galaxie will price match if you find a lower price! I had a wonderful experience working with them and would suggest them any day! You can find the lights we chose for the bathroom here.

That is basically all that we did to revamp the master bathroom! It was a relatively painless project that really paid off in the end with a stunning transformation. To see all of the "before" photos click the link below. Thank you for stopping by and be sure to visit back soon for the rest of the "after" posts of our renovation.