Design, Life, and Style.  A chic lifestyle blog. Design, Life, and Style about me link Design, Life, and Style advertisement/sponsorship link Design, Life, and Style travel reviews link Design, Life, and Style recipes/cooking link Design, Life, and Style fashion/style link Design, Life, and Style interior design link Design, Life, and Style home link
Showing posts with label Tried and True Recipes. Show all posts

Monday, July 1, 2013

Red, White, and Blue Deviled Eggs


The Fourth of July is one of my favorite holidays...only second to Christmas. This year I wanted to channel Martha Stewart and create something new in the kitchen.

If you follow me on Instagram you might remember that I made colorful Deviled Eggs for Easter. I dyed them pastel colors and it came out super cute. This time I decided to try it out for the biggest BBQing holiday of the year. Deviled Eggs are quick, easy, and yummy...perfect to bring to a cook-out.

I hope you enjoy the recipe. If you try it make sure to leave a comment and let me know what you think!

Thanks for reading!


Red, White, and Blue Deviled Eggs

1. Boil the eggs as you usually would. TIP: It is best to use older eggs because they will peel easier.

2. Peel the eggs and slice them in half (the long way)

3. Take the halves and remove the yolk. Set the yolk aside in a bowl.

4. Prepare the food coloring for egg dying as directed by the package. I used 1 tbs. of vinegar per 1/2 cup of boiling water added to a large bowl. Add 10-20 drops of food coloring (I used 20 drops)

5. Put the half hard-boiled eggs in the bowls of dye. If you want tie-dyed eggs similar to the blue eggs above add some extra food coloring while the eggs are already in the dye. Let the eggs sit in the food coloring for 5 minutes or until desired color is achieved.

6. While the eggs are in the dye. Mix the yolks with mayonaise, mustard, kosher salt, and freshly ground pepper. Add each ingredient to your personal preference. I used a heaping Tablespoon of mayo, a Teaspoon of Yellow Mustard, salt and pepper. Some people also like to add relish but I prefer to keep it pretty simple.

7. Remove the eggs from the dye. Let them dry flat side down on paper towels (I also pat them down with a paper towel once they're almost fully dry to get the extra dye off). Once dry add the egg mixture to the halves and top with a sprinkle of paprika. (I fill a plastic bag with the egg mixture and cut a small hole in one corner and use it as a pastry bag to nicely deposit the egg mixture in the egg halves).

Enjoy!


Sunday, April 21, 2013

Buffalo Chicken Salad


I was looking for a quick and easy recipe last week to make for my husband, Nic. Nic has 2 great loves in food...spicy food and cheese. So when my Mom sent me this Buffalo Chicken Salad recipe I knew this was something that he would love. This salad only takes about 15 minutes start to finish and is actually pretty healthy considering the chicken is not breaded. I also made it with a yummy healthy blue cheese dressing that I found from SKINNYTASTE.com. I highly recommend trying this dressing because it is made with greek yogurt and only a tablespoon of mayo so it is a great alternative to high fat dressings you might purchase from the store.


You Will Need:
3 Boneless Skinless Chicken Breasts
2 heads of Romain Lettuce
2 Tablespoons of hot sauce, I suggest using Frank's (add more if you like it spicy)
2 Teaspoons of Olive Oil
4 Celery Stalks Chopped
2 Carrots Coarsely Grated
2 Scallions (chop only the green parts)

Preheat the broiler. Place chicken between 2 sheets of waxed paper and pound with a mallet (or cast iron skillet like I did...it gets the job done fast) until 3/4 inches thick. Cut the chicken into 1/2 inch thick strips and put in a bowl. Toss the chicken with the olive oil and hot sauce. Arrange on a foil lined baking sheet and broil until cooked through (about 5-7 minutes).

In a large bowl combine lettuce, celery, carrots, and scallions. Toss with the dressing. Divide the greens between 4 plates and top with the chicken.

Makes 4 entree sized servings

So simple and so yummy! I know you will enjoy this recipe. My husband sure did...


Wednesday, April 3, 2013

Easy No Bake Banana Pudding


My family decided to do things a little differently this Easter and we had an Easter BBQ for dinner. We had steak, grilled chicken, yummy salads, and pastel colored deviled eggs. For dessert I made this incredibly simple banana pudding recipe. It does not require the use of an oven so it is one of my favorite recipes for the hot days of summer. It also only takes about 15 minutes to make so it is quick, easy, and most importantly delicious. Enjoy!

What You Need:

1 3.4 oz Package of Jell-O Instant Banana Pudding Mix
3 Bananas (medium sized)
30-40 Nilla Wafers
1 8 oz Tub of Cool Whip
2 cups of milk

Makes 14 1/2 cup servings (but I am positive everyone will eat more than a 1/2 cup so plan on making approx. a cup per person.)

Directions:

Step 1: Whisk together the pudding mix and milk in a medium sized bowl for 2 minutes. Let sit for 5 minutes to thicken.

Step 2: Slice your 3 bananas. I sliced mine about a 1/4 inch in thickness. Sit them aside for now.

Step 3: Get your serving bowl ready (needs to hold at least 2 qts). I usually like to use a trifle to serve this pudding in because it looks beautiful layered. Put a layer of half of the Nilla wafers on the bottom of your bowl. Flat side up. *I used 40 Nilla wafers. 15 on the first layer and 25 for the second. If you don't want as many wafers use 30.

Step 4: Layer half of your banana slices on top of the wafers.

Step 5: Spoon half of the pudding into the dish and spread evenly. Then repeat steps 3,4, and 5.

Step 6: All of your wafers, bananas and pudding should be used at this time. To finish the pudding top with your tub of Cool whip. Then refrigerate for at least 3 hours. I suggest 4-5 to let all the flavors really blend together.


Then you're done! This pudding is a crowd pleaser every time I make it. I hope you enjoy it as well!


Tuesday, March 26, 2013

Cleansing Green Smoothie: Time to get Beach Body Ready


Well friends, that time of year is coming up when you're starting to wear less and less clothing. I've set a goal for myself that this summer I want my body to be in the best shape that it has been since High School. I want to make sure I'm eating a balanced diet and getting all the nutrients that I need. One way to help with that is by drinking this simple green smoothie. This is a new thing for me so I'm not an expert by any means, but my amazing sister Tai drank a similar smoothie for a cleanse and she absolutely loved it! (shout out to Tai for letting me use her kitchen for this shoot as well). It may not taste like a milkshake but it tastes so fresh and clean that you will know its super good for your body. Enjoy!


You will need:

1 handful of kale leaves (make sure to take the leaves off of the stem) coarsely chopped
1 apple (I used a Gala apple) chopped
2 celery stalks chopped
about 1 tsp. of finely chopped ginger
1 small cucumber chopped

Tuesday, March 19, 2013

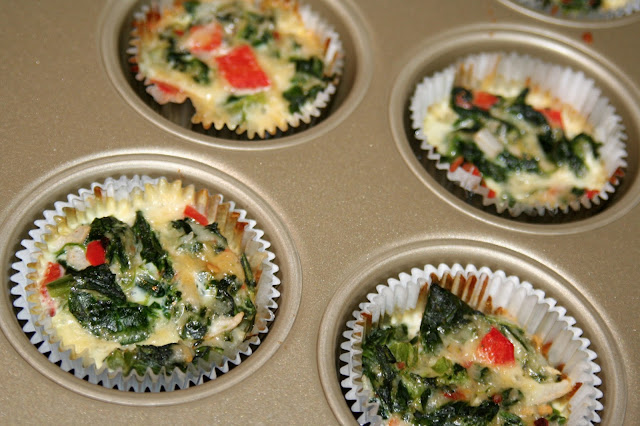
Skinny Mini Quiche Cups

The hubby and I are starting a low carb diet and one of my go-to meals is this super quick and easy mini quiche recipe. I originally found the recipe on Pinterest and it came from this site. I wanted to share the general ingredients that make up the recipe with my friends here on the blog. Feel free to customize with different veggie choices. Comment on the post and tell me what you think might be yummy to add!

Skinny Mini Quiche Cups

  • the whites of 6 eggs
  • 1/2-3/4 cup of chopped veggies...I used 3/4 cup total of chopped onion, red pepper, and green pepper
  • 10 oz. frozen spinach cooked and squeezed dry
  • 3/4 cup of cheese (you can use fat free, but I prefer to use a nice cheddar to get my dairy intake for the day)
  • Hot Sauce (optional)...I use Frank's hot sauce and do 3 shakes
  • sea salt and fresh ground pepper to taste
Combine all ingredients in a medium sized bowl and stir. Separate into 12 foil baking cups in a muffin tin.  Bake at 350 for 20 minutes and you are done! You'll know they are ready when you can stick a fork in the center of the quiche and it comes out clean. Super easy, low carb, and yummy!


quiche, easy quiche recipe, recipe, breakfast, quick breakfast recipe

Saturday, March 9, 2013

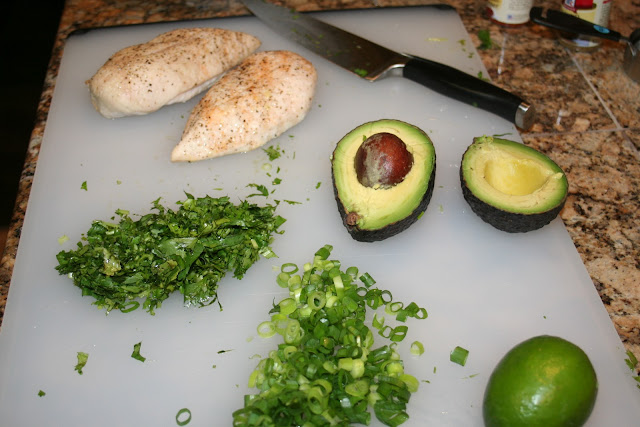
Guacamole Chicken Salad


Such a quick meal that is totally delish! It requires far less mayo than your typical chicken salad recipe and I like to kick it up with some spices. Also, I find it so difficult to cook for 2 and this makes the perfect amount for my hubby and I or could be increased for a larger family.

Guacamole Chicken Salad


You Will Need:
2 large chicken breasts cooked and shredded
1 Tablespoon Mayonaise
1 Avocado
Green onions (I used 3 stems)
Cilantro (A handful, or two if you really love it)
Fresh lime juice
Salt and pepper to taste (I use Kosher salt)
If you want some spice add 1/4 tsp Cumin and 1/4 tsp cayenne pepper

  • After shredding the chicken finely chop the cilantro and green onions.
  • Combine chicken, cilantro, green onions, mayo, and avocado in a mixing bowl.
  • Mix together and squeeze the juice of half a lime into the mixture.
  • Add salt, pepper, and spices to tase.
  • Serve with tortilla chips for dipping or stuff in a pita!
  • This recipe served 2 with some left over.

Tuesday, February 26, 2013

Skinny Spinach Dip With Greek Yogurt


One of my favorite recipes of all time to bring to a party is the Knorr Spinach Dip recipe (found here). This recipe is so yummy but it requires a full cup of mayo and a 16 oz. container of sour cream. While browsing their website I noticed they had a recipe using Greek Yogurt but it still used a full cup of reduced fat mayo (find it here). I've altered this recipe to be more health conscious and I LOVE how it turned out. I hope you enjoy!

Skinny Spinach Dip With Greek Yogurt


You Need:
1 Package of Knorr Vegetable Recipe Mix
16 oz. of Greek Yogurt (I used Chobani)
4 TBS. Mayonnaise
3 Green Onions Chopped
9 oz. Frozen Chopped Spinach
Freshly Ground Salt & Pepper to Taste

Directions:
1. Cook the spinach as directed. Drain of all liquid. (I let it cool and squeeze it dry)
2. Combine all ingredients in a medium bowl
3. Let chill for 2 hours and serve


Skinny Spinach Dip With Greek Yogurt

Makes 4 cups and serves the whole party

You Need:
1 Package of Knorr Vegetable Recipe Mix
16 oz. of Greek Yogurt (I used Chiobani)
4 TBS. Mayonnaise
3 Green Onions Chopped
9 oz. Frozen Chopped Spinach
Freshly Ground Salt & Pepper to Taste

Directions:
1. Cook the spinach as directed. Drain of all liquid. (I let it cool and squeeze it dry)
2. Combine all ingredients in a medium bowl
3. Let chill for 2 hours. Serve & Enjoy!

Getting your beach bod ready for summer? ...you may also want to check out my Skinny Poolside Dip recipe made with lots of veggies and lower fat ingredients!
Or if you're looking for a real healthy treat? My Green Smoothie Recipe might be right for you!

Sunday, January 20, 2013

Soft Chewy Chocolate Chip Cookies (made with pudding mix!)


These are hands down the best chocolate chip cookies I have ever eaten in my life. I originally got the recipe from a friend of mine at work and have tweaked it to my liking and it is AMAZING. You need these...now!

The Best Chocolate Chip Cookies Ever


2 sticks (1 cup) of butter softened
1 tsp. vanilla extract
2 eggs
1 cup brown sugar
1 cup granulated sugar
2 1/4 cup flour (I use 2 1/4 C in Provo, UT but if you're really high altitude add a tad more flour)
1 tsp. baking soda
1 3.4 oz box of Jell-O instant vanilla pudding mix (just the powder mix, don't make the pudding!)
1 package or Ghiradelli or Guittard Semisweet chocolate chips

Preheat oven to 350
***Tip- Make sure all ingredients are room temperature. This makes a huge difference. So don't add cold eggs or butter; if you do it will come out fine but not as amazing as if you follow this tip!

1. In a large bowl cream together butter, sugar (granulated and brown), eggs, and vanilla extract

2. In a separate medium sized bowl mix flour and baking soda. Gradually add the dry ingredients to the wet ingredients.

3. Last, mix in the vanilla pudding mix and chocolate chips.

4. Make spoon fulls about a heaping tablespoon large and drop onto cookie sheet.

5. Bake for 10-12 minutes. DO NOT OVER BAKE! Start checking them at 10 minutes and if the edges are not brown leave in for more time. The bake time will differ depending on your oven.

Now enjoy!!! Please leave a comment and let me know if you loved them!


Thursday, November 29, 2012

Mini Cheesecakes


I wanted to continue sharing some of my favorite holiday recipes on the blog. For me, an ideal holiday recipe is pretty, stress-free, and most importantly delicious! This recipe checks off on all three requirements! My Mom always made these as a part of her dessert spread for Christmas dinner.

Mom's Mini Cheesecakes

Cheesecake Mix:
3 (8 oz.) Packages of Philadelphia Cream Cheese
5 Eggs
1 Cup Sugar
1 1/2 Tsp. Vanilla Extract

Preheat oven to 300

Mix with mixer and pour into cupcake tins with paper liners. Bake for 30-40 minutes. DO NOT ALLOW EDGES TO BROWN. Remove from oven and let stand until topping is ready.

Topping:
1 Cup Sour Cream
1/2 Tsp. Vanilla Extract
1/4 Cup Sugar
Can of Cherry/ Blueberry Pie Filling (Whichever you prefer. I usually do both)

Mix all the ingredients together. Put about a tsp. of topping on each cheesecake. Then, spoon a dot of the pie filling in the center of each cheesecake. Return to oven for 5 minutes. Let cool then refrigerate until ready to serve.

Makes approx. 24 mini cheesecakes


5 Cheese Mac and Cheese Recipe


As promised I wanted to share this wonderful holiday recipe that has become a tradition in my family.  This 5 Cheese Mac and Cheese is totally worth splurging on caloric intake for and it is a hit with everyone old and young! The recipe was originally found in Patti Labelle's cookbook "Recipes for the Good Life" and can be found here.

Go and make it now! This is comfort food at its finest!


OVER THE RAINBOW MACARONI AND CHEESE


1 Tbsp Vegetable Oil
1lb Elbow Macaroni
8 Tbsp (1 stick) plus 1 Tbsp Butter
1/2 Cup (2 ounces) Shredded Muenster Cheese
1/2 Cup (2 ounces) Shredded Mild Cheddar Cheese
1/2 Cup (2 ounces) Shredded Sharp Cheddar Cheese
1/2 Cup (2 ounces) Shredded Monterey Jack
2 Cups Half-And-Half
1 Cup (8 ounces) Velveeta , cut into small cubes
2 Large Eggs , lightly beaten
1/8 tsp Freshly Ground Black Pepper

DIRECTIONS:


1. Preheat the oven to 350 degrees F. Lightly butter a deep 2 1/2-quart casserole.

2. Bring the large pot of salted water to a boil over high heat. Add the oil, then the elbow macaroni, and cook until the macaroni is just tender, about 7 minutes. Do not overcook. Drain well. Return to the cooking pot.

3. In a small saucepan, melt eight tablespoons of the butter. Stir into the macaroni. In a large bowl, mix the Muenster, mild and sharp Cheddar, and Monterey Jack cheeses. To the macaroni, add the half-and-half, 1 1/2 cups of the shredded cheese, the cubed Velveeta, and the eggs. Season with salt and pepper. Transfer to the buttered casserole. Sprinkle with the remaining 1/2 cup of shredded cheese and dot with the remaining one tablespoon of butter.

4. Bake until it's bubbling around the edges, about 35 minutes. Serve hot.


Tuesday, August 7, 2012

Oven Roasted Chicken


This is my go-to for when a recipe calls for "X Cups of Cooked Chicken." I've used it to make casseroles, calzones, chicken salad, EVERYTHING. It is super quick and easy and results in a nice juicy chicken breast that is ready to be transformed in any type of recipe.

Only 5 Easy Steps

1. Preheat your oven to 350
2. Rub your chicken in Olive Oil. Good EVOO is necessary in any kitchen.
3. Season with coarse salt and pepper. If you want a more rotisserie style chicken then add a salt based seasoning as well such as seasoning salt or Cajun seasoning.
4. Pop it in the oven for 35-45 minutes depending on the amount you are baking and the size of the pieces. I mostly use boneless skinless and it is the fastest only taking 20-30 minutes on average. If you are using bone-in pieces it will take the full 35-45 minutes. Make sure the juices have run clear and if you're really afraid of salmonella make sure the internal temperature is 160 degrees.
5. Let stand for 5 minutes and then use as you wish!

Friday, June 1, 2012

Tried and True Recipe: Skinny Poolside Dip


I think Pinterest is an amazing place to find recipes and ideas. However, I have had quite a few unsuccesful attempts at making a Pinterest recipe. I prefer to use recipes that get good reviews on websites or that have already been tried out by my friends or family. So I wanted to share a yummy snack recipe with you!
Nic and I had this while watching the Bachelor a couple weeks ago and we LOVED IT! It uses lots of veggies and low fat ingredients so I did not feel too guilty snacking on it. I will for sure be making this in the summer when I am actually poolside! Try it out yourself!


Skinny Poolside Dip

You will need:

1 red pepper
2 jalepenos (unseeded)
1 can of corn
1/2 can diced olives
16 oz fat-free cream cheese (softened)
1 packet Hidden Valley Ranch dip seasoning mix.
Mix ingredients together. Serve with crackers or raw veggies.


Now, getting your beach bod ready for summer? You may also want to check out my Skinny Spinach Dip recipe made with Greek Yogurt!